Before the Next Pavement Layer: Why Subgrade Conditions Matter
A roadway subgrade passes its density test on Tuesday. Overnight, rain collects near the shoulder. On Wednesday morning, a loaded construction vehicle leaves ruts in that same area. The next crew is ready to place aggregate base. Is Tuesday’s passing result enough to proceed?
The test result still describes the location, depth and conditions measured on Tuesday. What it cannot tell is how the surface held up after the rain and construction traffic. That is a practical concern for asphalt and concrete pavement. The example is hypothetical; it does not describe an actual project.
Why the Supporting Layers Matter
The finished pavement is only part of the roadway. Below asphalt, there may be aggregate base, subbase and prepared subgrade. Concrete slabs distribute wheel loads differently, but they also depend on reasonably uniform support. Weak or poorly drained areas can cause problems after the surface is placed, when they are harder to see and repair.
A project may specify stabilized subgrade, treated base, drainage layers or other materials. Each layer must be evaluated against its own plans, specifications and acceptance requirements. No single compaction percentage serves as a universal pavement-readiness criterion.
What Moisture and Density Testing Establish
Moisture makes a difference when soil is compacted. Many soils need some water to help particles pack together. Too much water can work against compaction, even with the same equipment and effort. Soil type matters, too: a clayey subgrade will not behave like a granular base.
ASTM D698 and ASTM D1557 establish laboratory moisture–dry-density relationships using standard and modified compactive efforts, respectively. They may produce different maximum dry densities and optimum moisture contents. “Optimum” identifies the moisture content at maximum dry density under the specified laboratory procedure; it is not a guarantee of satisfactory in-service performance.
Percent compaction is commonly calculated as field dry density divided by the applicable laboratory maximum dry density, multiplied by 100. For an illustrative field dry density of 125 pounds per cubic foot (pcf) and laboratory maximum of 130 pcf, compaction is (125 ÷ 130) × 100 = 96.2%. Whether that passes depends on the contract’s acceptance threshold, moisture requirements, reference test, and other provisions—not on an assumed universal standard.
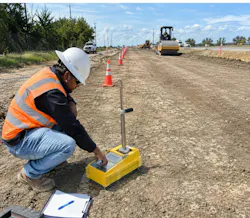
A nuclear density gauge can measure in-place density and water content under ASTM D6938 when the material and test setup fall within the method’s scope. That result is useful, but it represents the point and depth tested. It does not tell the whole story about drainage, bearing response, or the condition of the roadway between test locations.

A Worked Example: Conditions Change After Testing
Consider a section scheduled for aggregate-base placement. On Tuesday afternoon, a technician records a field dry density of 125 pcf against a laboratory maximum of 130 pcf: 96.2% compaction. Assume the contract requires at least 95%, all other applicable acceptance conditions are satisfied, and the field moisture content is 8%. The result is documented as passing.
Now assume approximately 1 inch of rain falls overnight. On Wednesday, water stands in a low area, and a loaded vehicle leaves ruts approximately 1.5 inches deep in part of the surface. Rainfall and rutting do not automatically prove the earlier density test failed or that the subgrade is unacceptable. They do show that current conditions differ from those documented on Tuesday.
Start with Tuesday’s report. Check the station limits, test depth, material, laboratory reference, moisture result and acceptance requirements. Then describe Wednesday’s condition: where water is standing, where rutting occurred, and how far the affected area extends. Record what was seen before drawing conclusions. The concern should go through the project’s established reporting process so authorized personnel can decide what, if anything, needs to happen next.
If further testing is directed, new results should have their own time, location, depth, and reference; they should not overwrite the earlier passing record. Conversely, a minor weather change does not necessarily justify retesting an entire section. The response should be proportionate and governed by project requirements.
The wording of the field note matters. “Ruts approximately 1.5 inches deep observed near the right shoulder after overnight rainfall” — this tells the next person what to look for. “Subgrade failed” — this makes an acceptance judgment that the observation alone may not support.
The same principle applies to a dry surface that has been heavily trafficked or regraded after testing. Equipment may disturb the upper portion of a prepared lift without changing conditions at the original test point. The appropriate question is not whether the previous result should be discarded, but whether the current work area still meets the requirements that govern the next operation. A targeted evaluation, where authorized, may be more useful than treating the entire project as uniformly affected.
Construction Sequencing and the Next Layer
Subgrade preparation can involve grading, moisture conditioning, compaction and treatment where specified. Base placement has its own gradation, lift thickness, moisture and compaction provisions. Stabilized materials may add requirements for application rates, mixing, timing, and curing. The Texas Department of Transportation’s (TxDOT) 2024 Standard Specifications address embankment, flexible base, lime treatment and concrete pavement in separate items; contract documents and special provisions determine what applies to a specific project.
After the next layer is placed, checking a questionable area becomes more difficult. Before covering a visibly changed surface, the project team needs to know what the earlier test covered, what is different now, and who is responsible for the next decision.
A Layer Readiness Assessment Framework
I use the term Layer Readiness Assessment Framework for a simple documentation check built around three questions. It is not a new field test, a substitute for project specifications or permission for an inspector to approve the next layer.
What did the previous evaluation establish? Record the material, location, depth, method, laboratory reference, result, and applicable acceptance criteria. This defines the evidence without treating one measurement as representative of an entire layer.
· Has anything materially changed? Compare the tested condition with rainfall, moisture variation, equipment disturbance, rutting, drainage, and other relevant observations. A change warrants consideration; it does not automatically invalidate earlier testing.
· What is required before the next operation proceeds? Consult the governing documents and refer concerns to personnel authorized to determine whether further evaluation, corrective work, documentation, or approval is required.
Five assessment areas can guide that discussion: material suitability, moisture condition, compaction and uniformity, surface stability and drainage and required authorization. These are prompts to check existing requirements, not independent pass–fail criteria.
A handoff note does not need to be long. Link the original test report, describe what changed, note who was contacted, and record whether a response is still pending. This matters when one crew tests the subgrade and another crew arrives later to place the next layer.
This framework is proposed, not field-validated or agency-approved. No measurable reductions in rework, delay, or cost are claimed. Its purpose is to make the sequence of evidence, changed conditions, and authorized decisions easier to follow.
Putting the Framework into a Field Handoff
For example, a handoff could identify Tuesday’s density report and station limits, note Wednesday’s water and rutting with photographs, and document the person notified. Any instruction to rework, retest or proceed should be recorded under the project’s normal procedures. That way, the next shift is not left guessing whether the issue was addressed.
Two shortcuts are worth avoiding. One is treating yesterday’s passing test as proof that nothing could have changed. The other is treating every rain event or rut as automatic grounds for rejection. The correct response depends on the actual condition and the contract.
Where photographs are used, captions should include station, offset or other identifiable location, view direction when relevant, and observation date. Where measurements are reported, the unit and measurement method should be clear. An original report should remain intact even if a later record documents changed conditions. This preserves a traceable chronology instead of turning separate observations into a single ambiguous acceptance statement.
Verify the Condition, Not Just the Record
Contractors perform the work and fulfill their assigned quality responsibilities. Inspectors and materials-testing personnel document assigned tests and observations and report concerns. Engineers or other designated contract authorities make acceptance and authorization decisions under the governing documents; specific responsibilities vary by project.
Before the next layer goes down, three questions should be easy to answer: What did the earlier test establish? What has changed? What do the contract documents require now? A passing density result is important. So is noticing when the ground no longer looks like it did when that result was recorded.
Repaka Sriman Narayana, PMP, is a civil engineering and construction management professional experienced in roadway inspection, construction materials testing, quality control and infrastructure projects in the United States and India.